
Using Forms & Fields
Form driven docs are fast, consistent, and provide structure for users.
How do fields work?
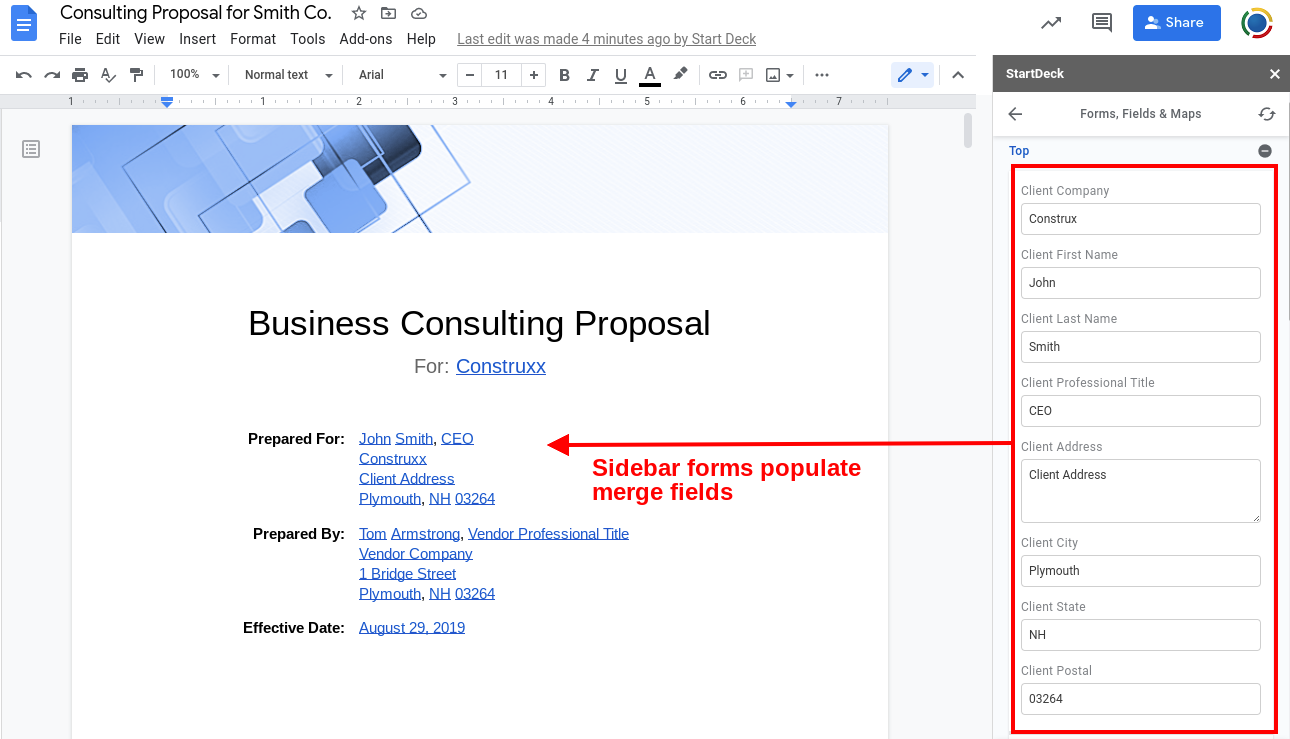
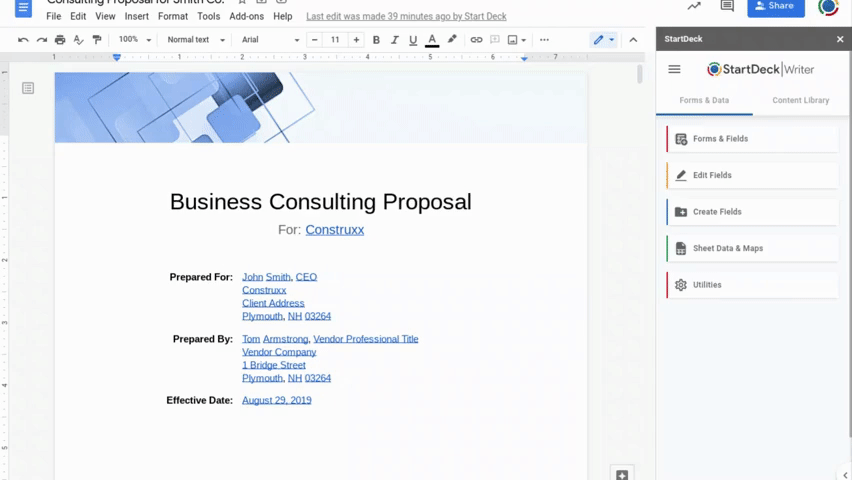
Doc fields have the appearance of a link and the functionality of a data container. Fields are placed throughout a document and serve as containers for various types of data such as dates, text, number, even lists. StartDeck Writer scans the doc for fields and adds them to the sidebar. This creates a sidebar form where fields can be edited and saved back to the document.
The sidebar displays fields in the order they appear in the document, but the field order can be modified (discussed later in this article).
Simply complete the form and update fields to populate the document. Integrating Sheets allows for calculated fields, image fields, maps and more. See our Demo Doc template for examples of field functionality.
Navigating Doc Fields #
Click on Forms & Data > Forms & Fields
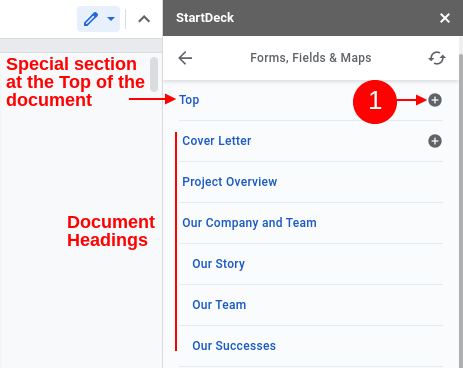
- The + sign will open forms for that section of the document. Document sections that do not contain fields display without the + sign.
Sections are defined by headings in the document along with a special ‘Top’ section for fields related to project information. In this example the ‘Top’ section includes client and vendor data, and some project information, like file numbers.
Tip: When entering field data, we recommend using the built in document outline to view the merge fields.
From the main menu: View > Show document outline
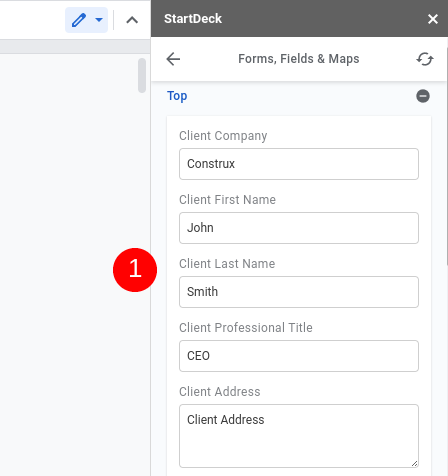
- This view shows fields for the selected section. Complete the form with data entry or field selections.
Update Doc Fields #
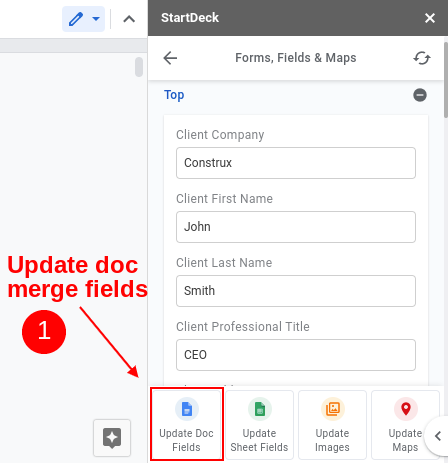
- At the bottom of the Startdeck Writer sidebar click "Update Doc fields". This will update the fields in the document with data from the sidebar form.
Tip: Remember, you can also edit and update fields from the Dashboard Project Page.
That's it! We will cover updating sheet fields, images and maps separately.
Create Fields #
From the main menu > Extensions > StartDeck Writer > Start > Forms & Data > Utilities > Create Fields.

- Field Label: This is what describes the field for the user.
- Field Name: This is the ‘behind the scenes’ technical name. There are rules for this name, like no spaces. But don’t worry about the details, we create this name for you and it usually is very close to the field label entered in step 1 above.
- Doc Field Type: Select a field that matches your data type:
- Standard Text (short entries)
- Text Area (long entries)
- Selection (selection only)
- Combobox (selection or entry)
- List (builds a comma separated list)
- Bullet List (builds a bullet list)
- Number (only numbers)
- Currency (US currency, more to follow)
- Percentage
- Date (select or enter)
- Phone
- Default Value: Optional. This is what shows in the field until something else is entered.
- Field Tip: This displays on mouse-over.
- Options:
- Required: StartDeck won’t update the merge fields if required fields aren't completed.
- Insert Break Before: Inserts a visual break in the sidebar before the field. This allows you to group fields in the form which helps users organize inputs.
- Create Field: This creates the field at the cursor location.
Edit Fields #
From the main menu > Extensions > StartDeck Writer > Start > Forms & Data > Utilities > Edit Fields.
Fields are organized by document headings. Click on a field name to edit. All of the options available when creating a new field are available. Fields may also be re-ordered with a drag and drop action.
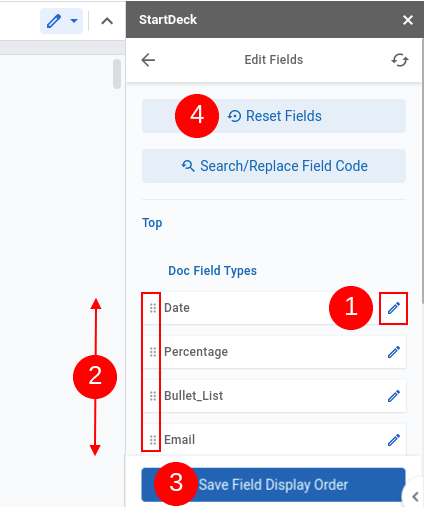
- Select the field to edit. This will open the field editor where you can make changes to the field as needed.
- Drag and drop to reorder the field display in the sidebar.
- Click Save Field Display Order to save.
- Reset Fields: This ‘cleans up’ fields if they've been copied and pasted from another doc. Pasted fields merge just fine, but if you actually click one, it will open the source doc. Reset Fields Links fixes that little annoyance, among other things.
If fields are not working as expected try Reset Fields.
Sheet Data and Sheet Fields #
Data flows both ways, from doc to sheet, and sheet to doc. This allows us to integrate data between the apps, run calculations, make maps and more. Here’s the data flow:

All the merge field data in your Doc is automatically sent to a table called ‘_DocData’ on the Doc Data tab of the linked Sheet. This table of data is updated each time the user updates the fields in the linked document.
Doc data can then be pulled from this table via lookup formulas and used to populate tables, provide input for calculations, create Google maps, and more.
See our Demo Doc template for examples of doc data used to populate a sheet, perform calculations using the doc data, then merge results back to the doc as a s_field. This data flow brings calculations to doc data.
Link a Sheet #
From the main menu > Extensions > StartDeck Writer > Start > Forms & Data > Sheet Data & Maps
Templates and Projects created with the StartDeck Dashboard automatically link Doc and Sheet files, but you can do this on your own easily:

To add or change a linked sheet:
Forms & Data > Sheet Data & Maps
- Paste the sheet URL in the sidebar.
- Click the refresh icon.
- This will display a list of sheet fields, organized by sheet.
Sheet Fields #
Sheet fields (s_fields) merge data from a linked spreadsheet to the document. Sheet fields merge into the doc as read only fields — meaning edits to sheet fields are made in the linked spreadsheet. s_field data is automatically consolidated to the s_fields sheet and can be used for a number of purposes. Learn more here.
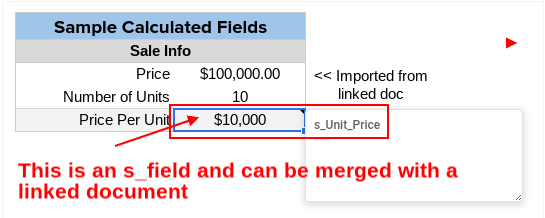
A sheet field is created by adding a cell note with the sheet field name (right-click on cell and select Insert Note). This example shows data imported from the doc (Price, Number of Units) and the calculated Price per Unit s_field (s_Unit_Price):
Two Sheet Field Types #
There are two kinds of sheet fields:
Sheet Fields (s_fields) | Description | Cell Note Syntax Example |
|---|---|---|
| s_FieldName | Merges any single cell value into the doc & maintains sheet formatting. | s_Comp_1_Property_Name |
| s_Image | Merges an image into the doc that is represented by a URL. | s_Image_Comp_1 |
| The term sheet fields and s_fields are used interchangeably. | ||
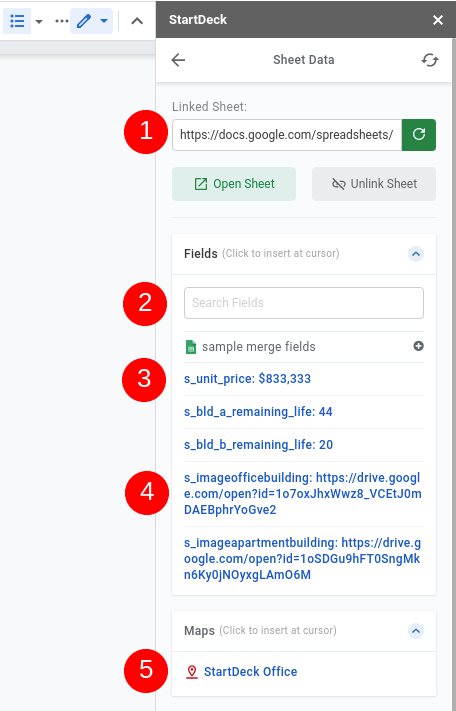
- The linked sheet. The sheet URL is added automatically for projects created with StartDeck templates via the Dashboard, but may be added or changed here at any time; simply paste the URL in the box and click the refresh icon.
- Enter any part of field name to search.
- This is a s_field and will populate the doc with a s_field containing data from the linked sheet. In this example, the s_field name is ‘s_Unit_price’.
- This is a s_image field and will populate the doc with an image represented by a URL in the sheet cell. In this example, the s_field name is ‘s_ImageApartmentBuilding’ and the cell contain the image URL.
- This is a map field. See this KB article for more info on maps.
About Image Fields #
StartDeck has two separate image functions, subject images and s_field images.
- Images can be inserted in bulk from the Project Page. This is designed for subject images. See the project Page article for information.
- s_field images are designed for images associated with sheet data, typically database records. This article covers s_field images associated with sheet data.
- Sheet images are represented by the image URL.
- Cells containing an image URL have a unique name: s_image, for example s_imageComp1
- All s_image fields automatically merge to the linked document as images.
This is the image data flow:

Tip: Copy images to project images folder - Google will automatically generate a URL for the image.
Tip: Images will automatically ‘best fit’ by width in table cells.
Tip: Manually resized images will retain dimensions after field updates.
Below are examples of s_image names, image URLs and the resulting merge field images.

Image URL: https://drive.google.com/open?id=1oSDGu9hFT0SngMkn6Ky0jNOyxgLAmO6M

Image URL: https://drive.google.com/open?id=1o7oxJhxWwz8_VCEtJ0mDAEBphrYoGve2
Image Field Syntax
Image fields have the following syntax. To view syntax, click on the image and view the link.
#SD_S::SF=sheet_name!s_imagename:SD_E
The syntax from the first example above is:
#SD_S::S_F=sample merge fields!s_imageapartmentbuilding::SD_E
Tip: How to Find s_fields in a Workbook
To find an s_field in a workbook, follow these steps:
- In the workbook, navigate to the s_fields sheet, which is usually at the far right of the worksheet tabs.
- The s_fields sheet will have the sheet names organized by worksheet in Column B, the s_field names in Column C, and the s_field values in Column D. Utilize the workbook's find function to search for a specific s_field name.
- To find out where the s_field is used, look in Column D next to the s_field name and click on the cell to view the formula; this will show you the s_field cell address.
- A quick method to get to the s_field directly is to copy the cell address from the formula you found in Column D and paste it into the range name box, then press Enter. The range name box is located on the left side of the formula bar, which is right above the row numbers on the workbook. If the formula bar is not displayed go to View > Show > Formula bar.
Update Sheet Fields #
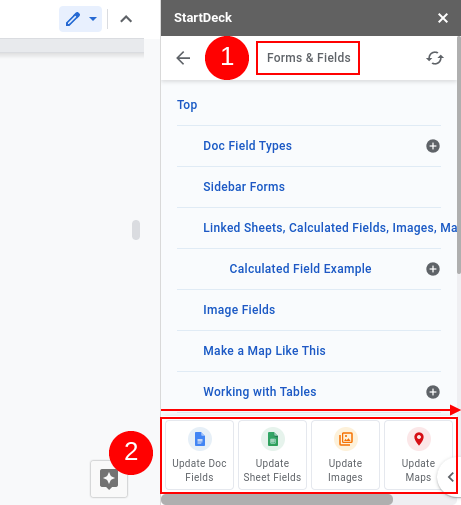
- All field updates are made from the Forms & Fields sidebar.
- Best Practice: Update from left to right starting Doc fields - this pushes the most recent doc data to the sheet. Any sheet calculations requiring doc data will then have current data.
Tip: Save time by updating only what has changed. For example, maps and images usually don't require updates as often as doc and sheet fields. In those cases, skip the images and map updates.
Tip: Always update all field types before final publication.
s_field Sheet #
The s_field sheet is automatically generated and populated with all of the s_field data in the workbook, listed by worksheet. This creates a handy table (_s_fieldsTable) which centralizes disparate worksheet data to a single table. This table has two purposes:
- Merge with a linked doc
- As a centralized resource for performing lookups (search) and extracting data for use in the workbook. For example, in the appraisal template, value conclusions from each analysis (cost, sales, income) are saved to the s_field sheet (in the _s_fieldsTable). References to these values are more easily made from a single table, compared to collecting data from several worksheets and numerous tables. Think of the s_fields table as a central repository for the workbook.
How to Get More Help
- Email support@startdeck.com
- Request a web meeting here